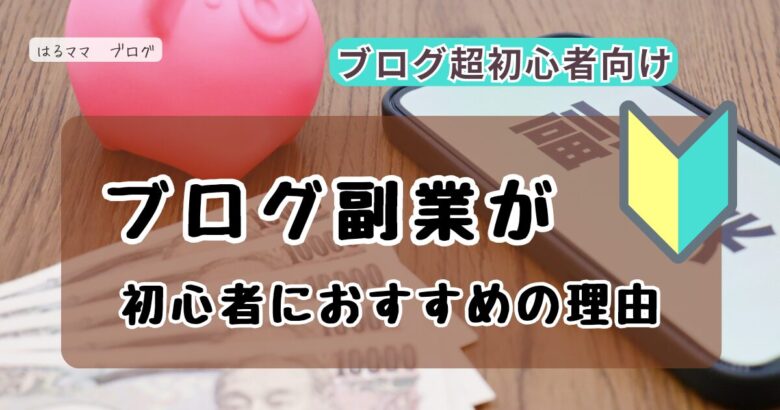
SWELL
【WordPressブログ】 をConoHaWINGで開設する手順
当ページのリンクには広告が含まれています。
\ 期間限定!300円分貰えるチャンス!/


「ブログを始めたいけど、何から手をつければいいの?」
そんな悩みを持つ方に向けて、初心者でも簡単にWordPressブログを開設できる方法をご紹介します!
この記事では、レンタルサーバー「ConoHa WING」を利用して、最短10分でブログを始める手順をわかりやすく解説します。

\ 知りたい項目をクリックしてね! /

ブログでアフィリエイトをしたいです、やり方を教えてください!
 はるママ
はるママまずは自分のブログを開設してみましょう。
はじめての方でも、この記事の手順通りに進めれば最短10分でブログをはじめられますよ✨
パソコンとか詳しくなくても大丈夫ですか?
はるママ大丈夫です!ブログの開設は、ConoHa WINGを使えば一括で設定や管理を行ってくれます。
ブログ開設後は、開設したブログの細かい設定、実際の記事の書き方や収益化方法を勉強する必要はありますが、
ブログ開設は『今日1日で終わる』ので、最短10分後にはブログを書き始める事ができますよ✨
WordPressを始める5つのSTEP
 はるママ
はるママ普通のサイト登録のように、画面に従い入力していくだけなので、それほど難しくありません✨
🔎おすすめのプランや、設定方法を知りたい方はこの記事を見ながら開設を行いましょう!
目次
【初心者おすすめ】ConoHaWING について
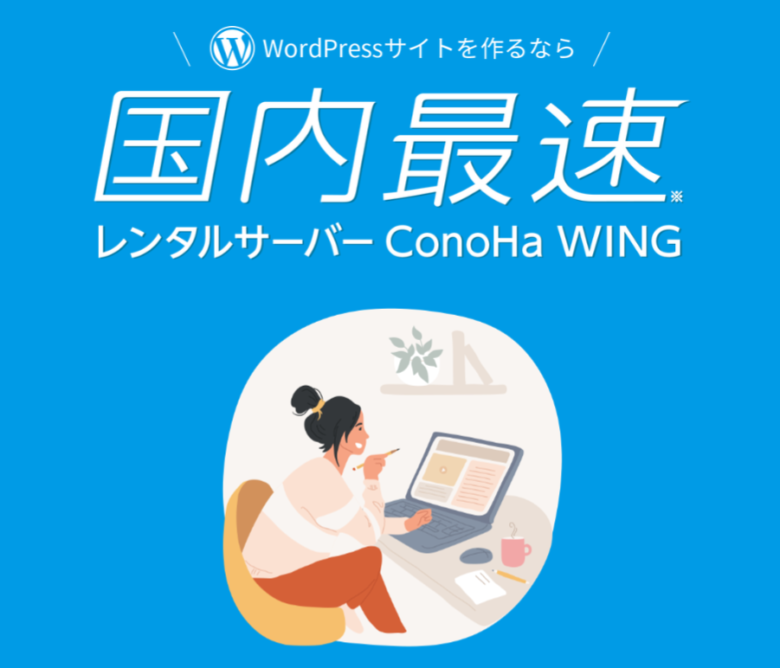
まず初めにレンタルサーバーと契約しますが、ブログはレンタルサーバー ConoHa WING を使えば初心者でも簡単にブログ開設を行えます!
【レンタルサーバー】って何?
レンタルサーバーは、特定の目的でサーバーを借りるサービスで、ホームページ公開に必要なハードウェアや管理を業者が代わりに行います。
これにより、利用者はサーバーの準備や管理の手間を省く事ができるメリットがあります!
例えば、ブログ開設時にはWordPressの設定が自動で行われ、初心者でも簡単に始める事ができるようになるのです!
このように、レンタルサーバーは初心者が手軽にウェブサイトやブログを運営するのに便利なサービスです。
現在のレンタルサーバーの中では『 ConoHa WING 』がコスパ・性能どれを取っても初心者におすすめのブログサービスです✨
はるママ私もConoHaを使って開設しました!
『初心者でも簡単で機能性も高く安い』レンタルサーバーなのでぜひ利用してみましょう✨
ConoHa WINGがおすすめな理由
ConoHa WINGは、初心者に優しいレンタルサーバーサービスです。

以下の特徴があります👇
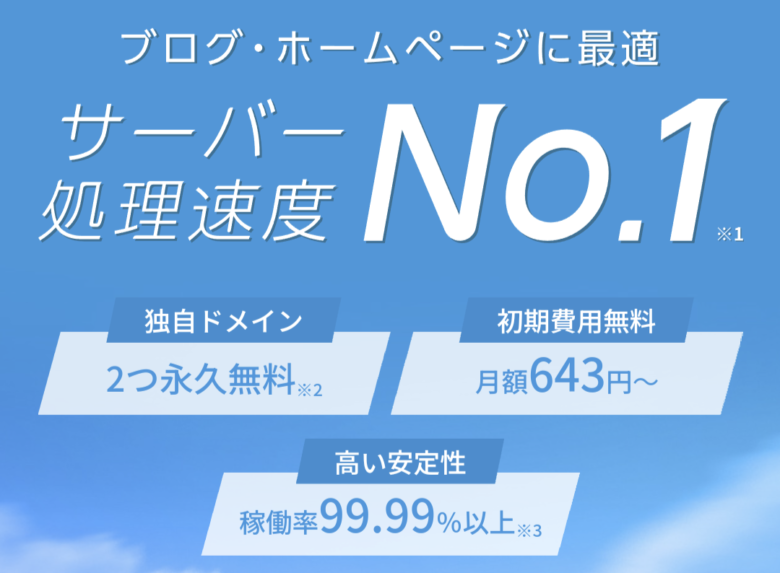
- 高速表示:国内最速クラスの表示速度で、ストレスのない閲覧体験を提供。
- コストパフォーマンス:月額968円から利用可能で、独自ドメインが2つ無料で取得できます(WINGパック契約時)。
- 簡単操作:管理画面が直感的で、初心者でも迷わず操作できます。
- 充実のサポート:困ったときには安心のサポート体制が整っています。
ConoHa WINGは国内最速と言われる表示速度の速さで、かつ料金の安さが特徴的です。
レンタルサーバー エックスサーバーも人気ですが、ConoHaは比較的新しく立ち上げたサーバー(開始2018年9月)の割にはサポートも強く、安いし高機能で操作が簡単なのが大人気の理由です。
はるママレンタルサーバーは『 安い・早い・安心 』なサービスを選びましょう!
WordPressブログ をConoHaWINGで開設する方法
STEP① : レンタルサーバーを契約する
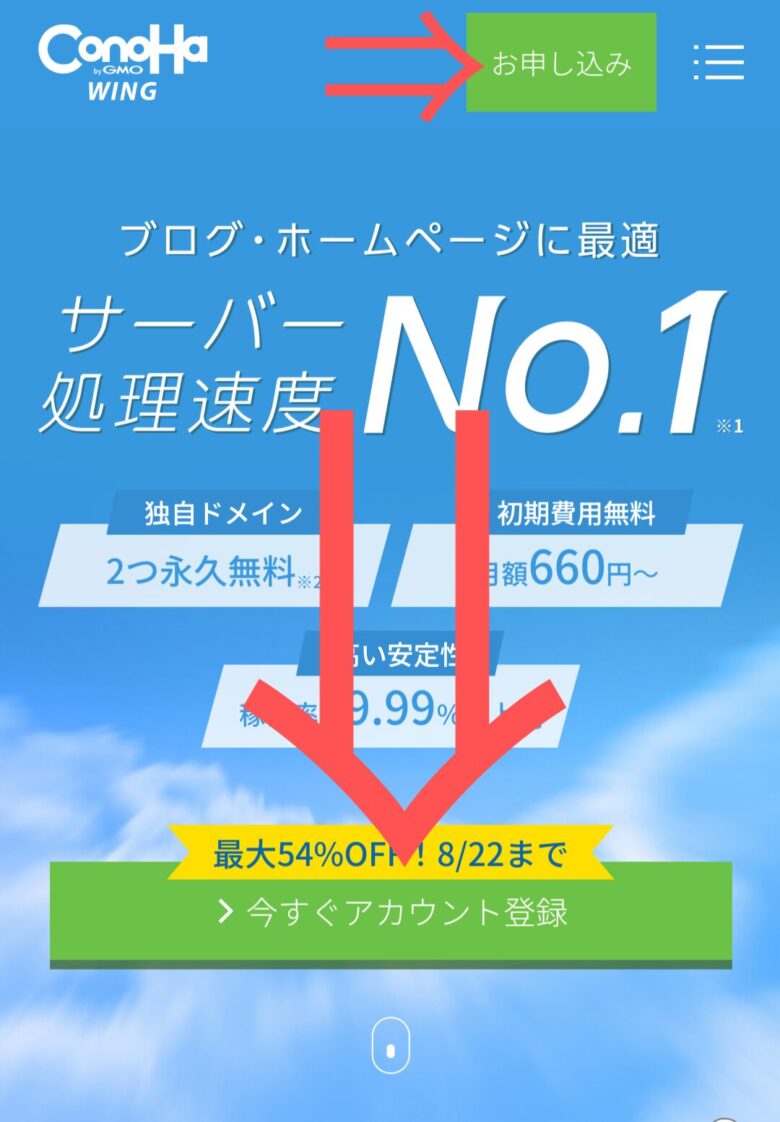
はじめに『ConoHa WING公式サイト』にアクセスします👇
\ 今だけ!期間限定キャンペーン開催中! /
公式サイトにアクセスしたら、
【お申し込み】や【今すぐアカウント登録】をクリックします。
お申し込み画面が表示されるので、初めてご利用の方をクリックし、
『メールアドレス』と『パスワード』を入力して、『次へ』をクリック

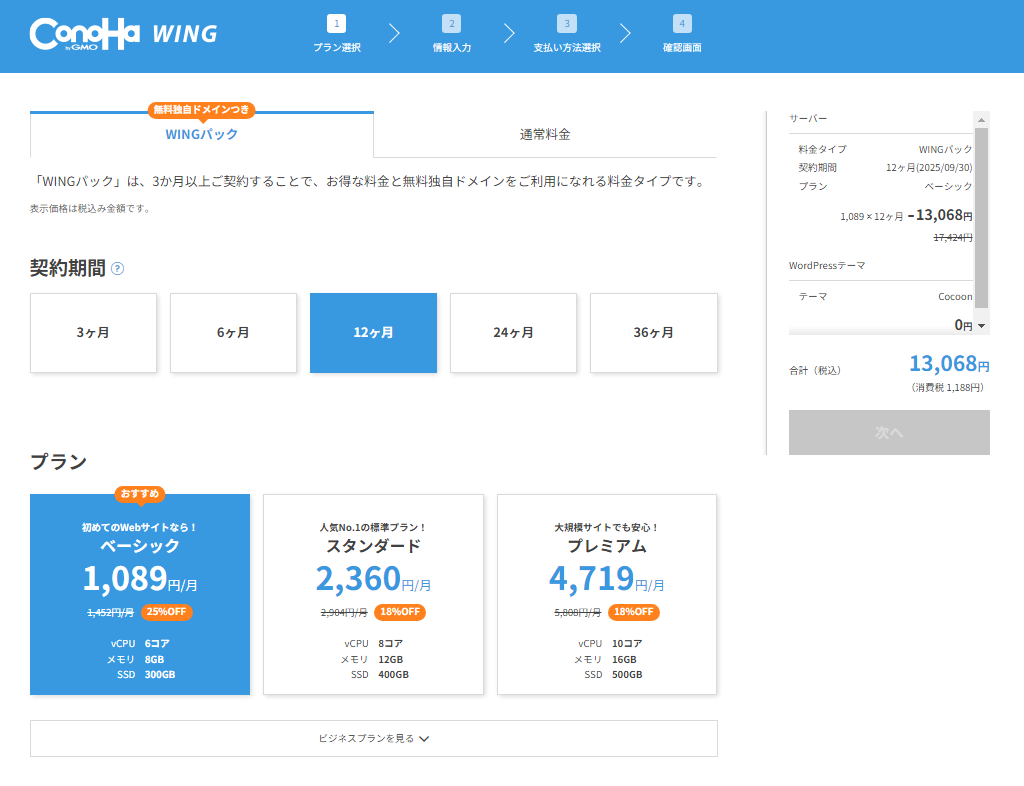
【WINGパック】を選択
詳しい手順はこちら
料金タイプは『WINGパック』を選択します。
『WINGパック』は長期契約、『通常料金』は1ヶ月ごとの契約です。
『WINGパック』は最大52%〜の割引が受けられ、独自ドメインが2つ無料でもらえるため、断然『WINGパック』がお得です。
契約期間はお好みでOK。
契約期間が長いほど割引額が大きくなりますが、迷ったら12ヶ月がおすすめです。
ブログは1年で結果が出ることが多いので、どのブロガーもまずは1年契約をするのをおすすめしています。
プランは『ベーシック』。
初心者や個人ブログなら『ベーシックプラン』で充分です。私のサイト運用も全く問題なく出来ています。
プランはいつでも変更可能なので、サイトの規模が大きくなったら変更するようにしましょう。
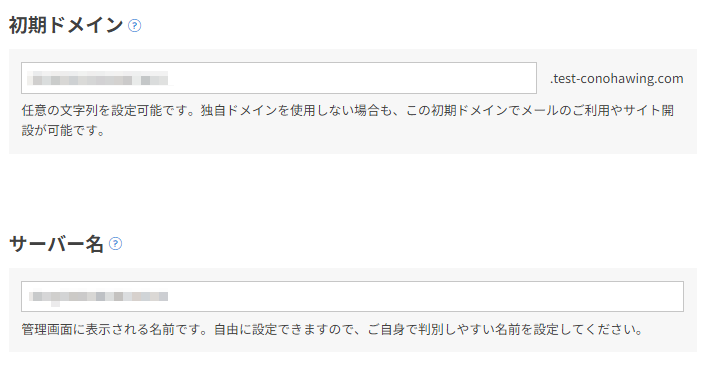
初期ドメインはなんでもOK
初期ドメインは自分のブログのドメイン等には、影響するところがないので、自由に入力してOKです。
サーバー名はそのままか、自由な名前でOK。
管理画面に表示されるだけなので、なんでもOKです。
STEP②:WordPressかんたんセットアップを利用する
次に、「WordPressかんたんセットアップ」を利用していきます👇
WordPressかんたんセットアップ
かんたんセットアップとは、手順が複雑な「ドメイン取得・サーバーとの紐付け・WordPressインストール」を一括で簡単に設定してくれるConoHaWINGのシステム。
はるママConoHaWINGでの登録を私がおすすめする理由の1つで、誰でも簡単にブログを開設できるようになります!
WordPressかんたんセットアップ
詳しい手順はこちら
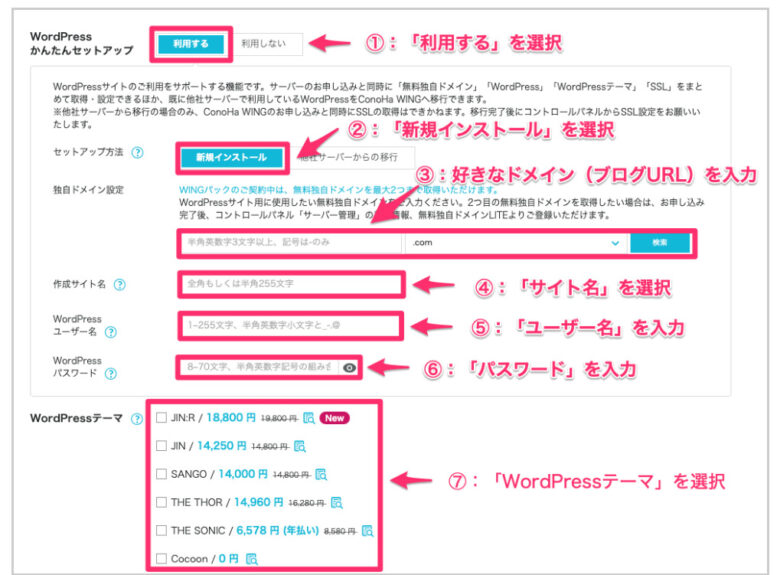
WordPressかんたんセットアップを選択
「利用する」を選択すればOK。
セットアップ方法
初めてサイトを作る方は、「新規インストール」を選択。
すでに他社でサーバー契約をしている方でConoha Wingに移行したい方は、「他社サーバーからの移行」を選択。
独自ドメイン設定
ここでインターネット上の住所である『独自ドメイン』を取得していきます。
独自ドメインはサイトのURLで変更できないので注意してください。
当サイトでいうと『https://harumama.com』の赤字部分が独自ドメインです。
ドメインの選び方
『.com』、『.net』等のドメインがありますが、基本的にどれを選択してもOK。
迷ったら、知名度が高い『.com』、『.net』、『.jp』を取得することをおすすめします。
はるママドメインは早い者勝ちで、すでに使われているドメインは登録できないので違う文字列にしてみましょう!
作成サイト名
サイト名を入力します。後からブログ画面で変更可能なので、とりあえずは仮のものでもOKです。
例えば、『主婦のポイ活ブログ』や『食べ盛り子供4人の毎日ごはん』など書きたいテーマに沿ったサイト名でもいいですね!
WordPressユーザー名
WordPressにログインする際に使うユーザー名。
ログインする際に必要なので、ユーザー名は忘れないようにメモしておきましょう。
WordPressパスワード
WordPressにログインする際に使うパスワード。
こちらもログインする際に必要なので、パスワードは忘れないようにメモしておきましょう。
WordPressテーマ
WordPressテーマとは、サイトのデザインを整えてくれるツールです。
複数の選択肢がありますが、後から変更できるため、とりあえずは無料の『Cocoon』を選べばOK。
STEP③:各種情報を入力する
次に、各種必要な情報を入力していきます👇
 はるママ
はるママあとは氏名等の情報を入力するだけなので、手順見なくても進めることができますよ!
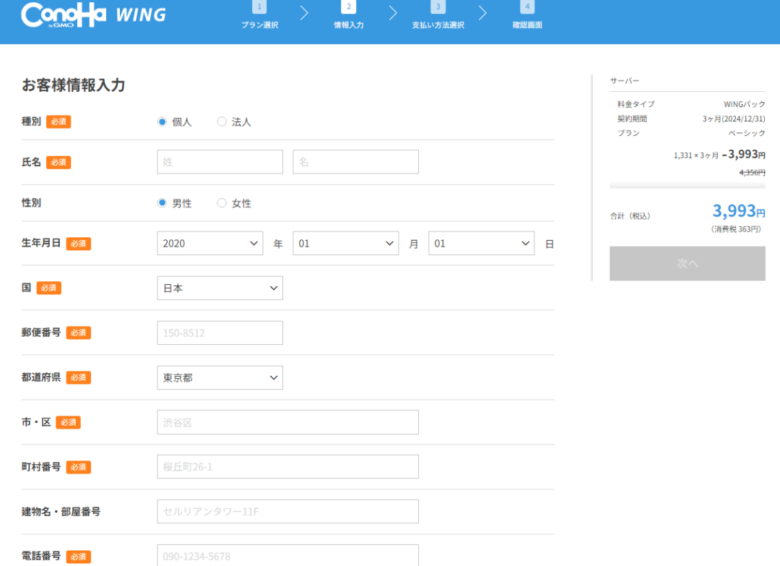
お客様情報を入力する
会員情報を入力します。
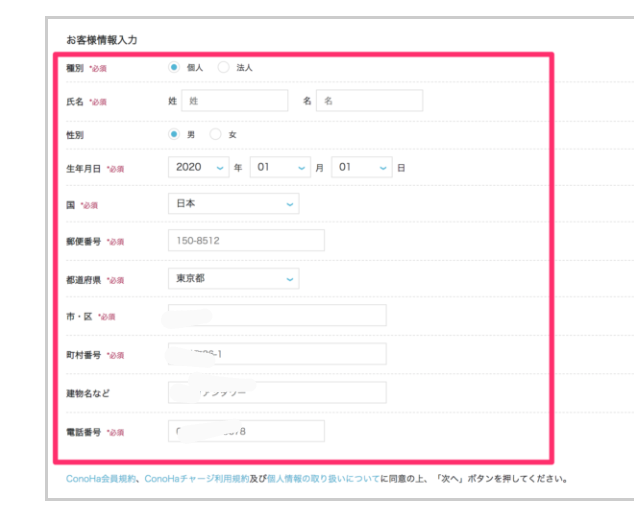
入力後『次へ』をクリック。
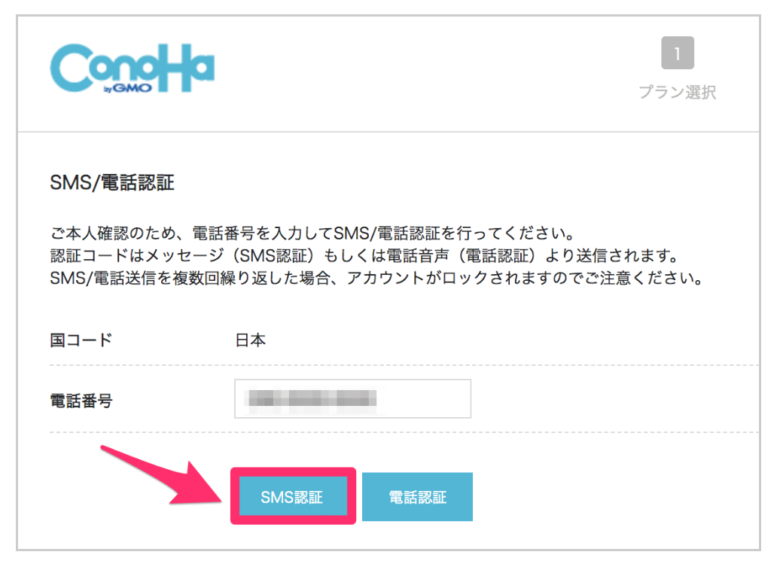
SMS認証を行う
続いて、『SMS認証』で本人確認をしていきます。
自分のスマホの電話番号を入力して、『SMS認証』をクリックします。
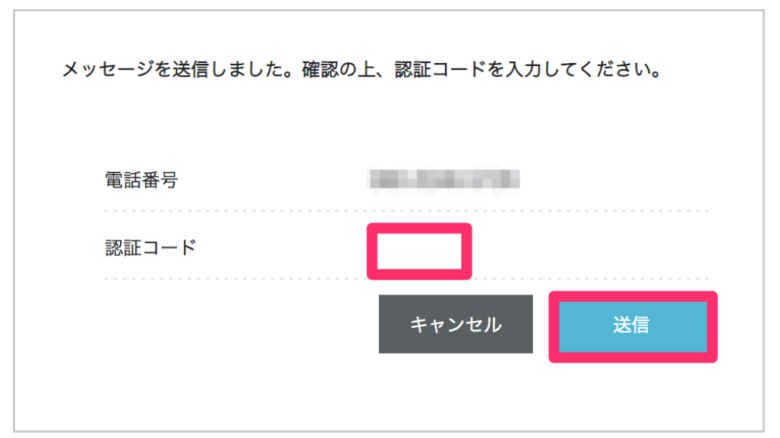
スマホに『認証コード』が送られてきます。
送られてきたコード番号を『認証コード』に入力して、『送信』をクリックします。
お支払い情報を入力
お支払い方法を入力します。
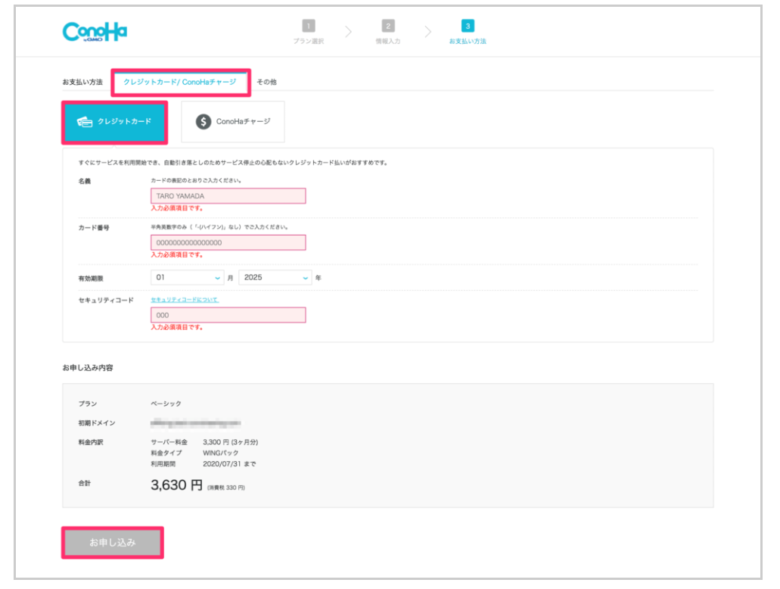
支払い方法は『クレジットカード』と『ConoHaチャージ』から選べますが、
クレジットカード支払いの方が払い忘れもなく、手間もかからずオススメ。
はるママクレジットカードがない方はConoHaチャージにしましょう!詳しくは公式サイトご利用ガイドをチェックしてね👈
最後に『お申し込み』をクリックします。
以下のような画面が出たらOK。
 はるママ
はるママお疲れさまでした!これで登録は完了ですが、最後に大切な初期設定があります、頑張りましょう!
STEP④:SSL化設定をする
続いて、『SSL化設定』というものをします。
\ ConoHaでは独自SSL化が無料! /
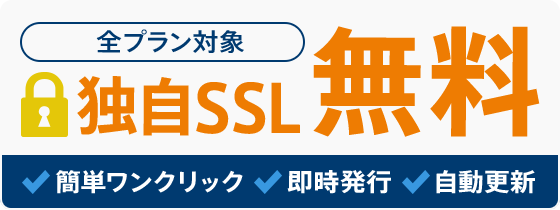
SSL化とは
SSL化は通信データを暗号化する仕組みで、サイトの安全性が高まり、サイトURLが『http』→『https』に変更されます。
はるママ実は自分で設定しなくても、30分〜1時間程度放置しておくだけで勝手に設定をしてくれます。
もし反映されたか心配な方や、2時間以上経っても反映されない方は、以下の手順で確認してみてください!
SSL化設定をする方法
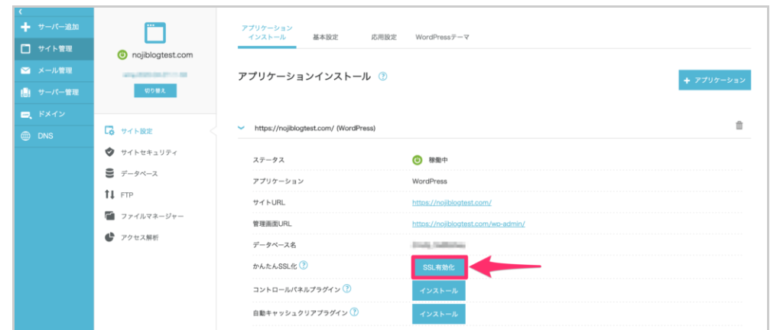
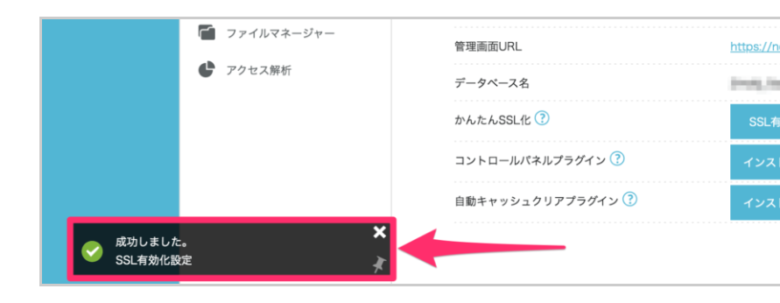
- 左メニューの『サイト管理』をクリック。
- 『サイト設定』をクリック。
- 『SSL有効化』をクリック。
はるママ『SSL有効化』がクリックできない(ボタンが灰色)の場合、30分程待ってみてください!青色に変わればクリックできます。
『成功しました。SSL有効化設定』というポップアップが表示されれば、SSL化設定は完了です。
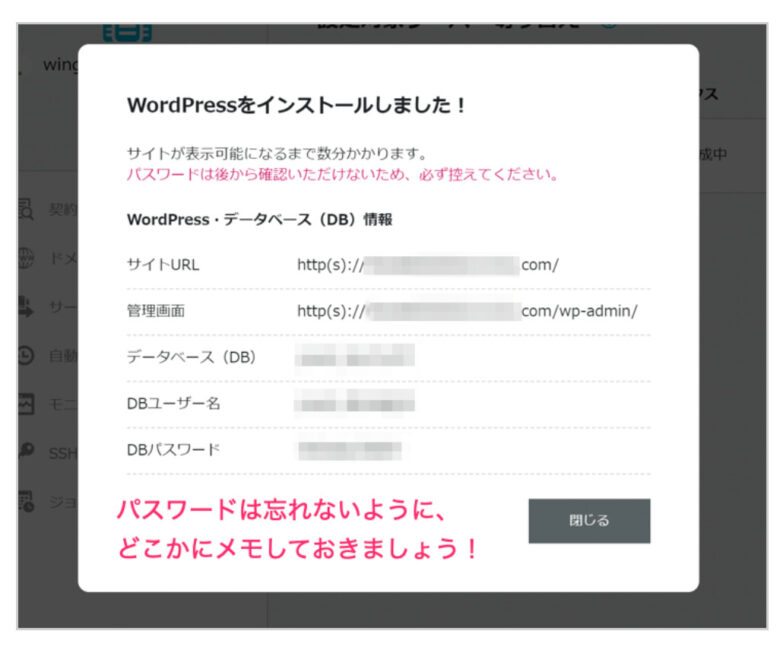
WordPress管理画面にアクセスしてみる
次に、WordPressにログインしてみましょう!

『管理画面URL』にアクセスします。
URLにアクセスすると『WordPressのログイン画面』が表示されます。
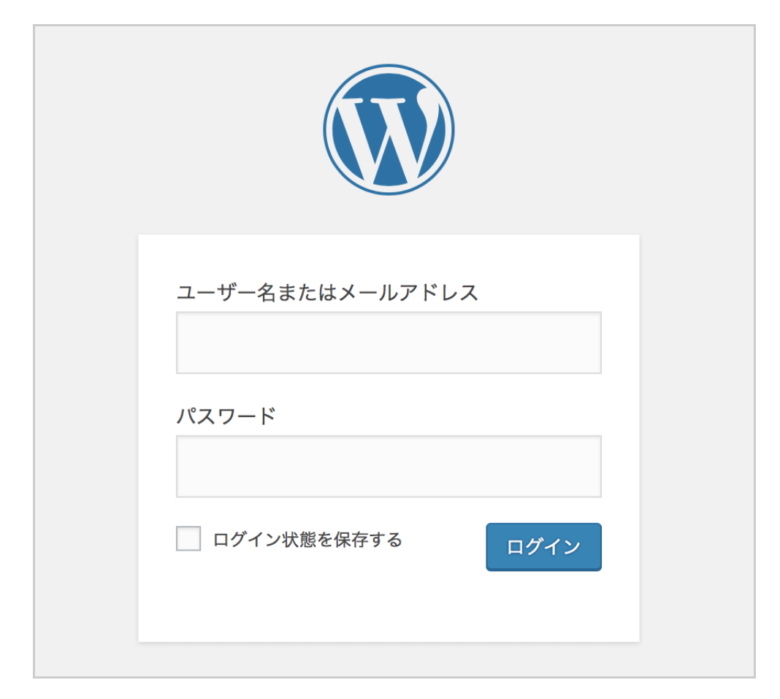
先ほど登録したWordPressの『ユーザー名』と『パスワード』を入力し、ログインしましょう。
はるママ今すぐブログを書けますが、WordPressブログで初めに必ずやった方がいい初期設定を紹介します!
STEP⑤:WordPressの初期設定をする
次にWordPressブログの設定で『これだけは早めに設定しておかないとダメ』といった初期設定を行なっていきます。
やらなくてもブログ記事は書けますが「記事の書きやすさ」や「収益化させやすくする」理由があるのでなるべく初めにしておきましょう。
1度に全て行う必要はないので、時間のある時に行いましょう!
ブログ初期設定14個
- サイトタイトルなどの設定
- コメントに関する設定(ディスカッション設定)
- ブログ記事のURL設定(パーマリンクの設定)
- プライバシーポリシーの設定
- カテゴリーやタグの設定
- WordPressテーマの設定
- プラグインの設定
- アナリティクスの設定
- サーチコンソールの設定
- XMLサイトマップの作成
- お問い合わせフォームの作成
- プロフィールの設定
- トップページの設定
- 不要なコンテンツを削除
はるママサイト運営をスムーズにするために行うのでなるべく早く設定しましょう!
詳しい設定方法はこちらの記事からどうぞ👇
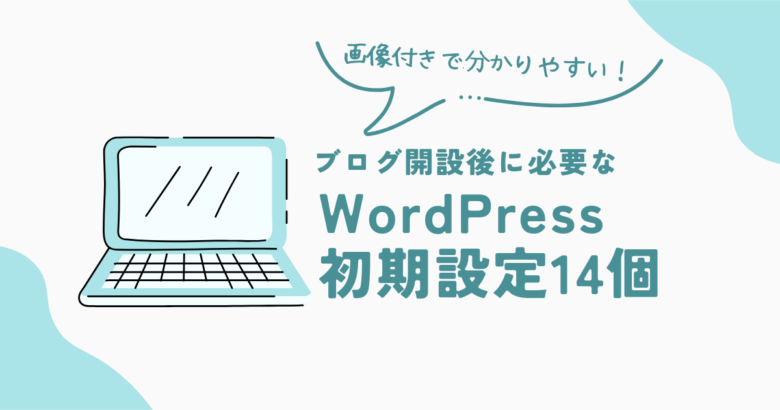
>>ブログ開設後に行う初期設定14個
あわせて読みたい
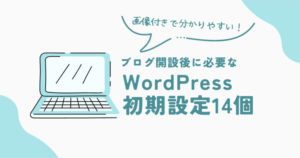
【アラフォーのブログ】ブログ開設後に必要なWordPress初期設定14個
【ブログ開設後の初期設定】やらなきゃ”後悔する”ブログ初期設定14個を紹介!初期設定をするとブログ運営が快適になります☺️記事を書く前に必ず済ませよう。
これで、今日からブログを書くことができ、記事の投稿やデザインのカスタマイズもすぐに始められます!
【ブログを始める5つのメリット】
ブログを始めるメリットはたくさんありますが、
特に初心者や子育て中の方にとって嬉しいポイントをわかりやすくまとめてみました!
1. 自分の経験が誰かの役に立つ
日々の育児、節約、ポイ活、働き方など…
「こんなこと誰の役に立つの?」と思っても、同じことで悩む人にとっては“貴重なヒント”になることもあります。
2. スキマ時間をお金に変えられる
通勤中や子どもが寝たあとにコツコツ書くことで、広告収入やアフィリエイト収入が発生。
大きな元手がいらず、リスクも少ない副業として人気です。
3. 思考が整理されて、自分の強みが見えてくる
文章にして発信することで、「自分が本当に伝えたいこと」や「得意なこと」が明確になります。
自己理解が深まることで、発信にも自信が出てくる!
4. 働き方の選択肢が広がる
発信を続けるうちに、ライターの仕事や商品レビューの依頼、講座の開講など、新しいチャンスが広がることもありまはし。
5. 全国・世界中の人とつながれる
ブログはネット上の名刺。共通の興味を持つ人との出会いや、新しいコミュニティに参加するきっかけにもなります。
まずは一歩、ブログをはじめてみませんか?😊✨
「特別な知識がないから…」「書けることなんてないし…」そんなふうに感じていた私も、最初は右も左もわからない状態でした。
でも、一歩踏み出してみたら、思っていた以上に「自分の言葉」が誰かの役に立っていたんです!
今では、ブログが私の「ちょっと特別な居場所」になっています🌱
あなたの経験や気づきは、きっと誰かの力になる。そしてそれが、少しずつ「自分の力」にもなっていきます🌱
さぁ、今日から一緒に「書くこと」で未来をつくるブログをやってみましょう🤗✨
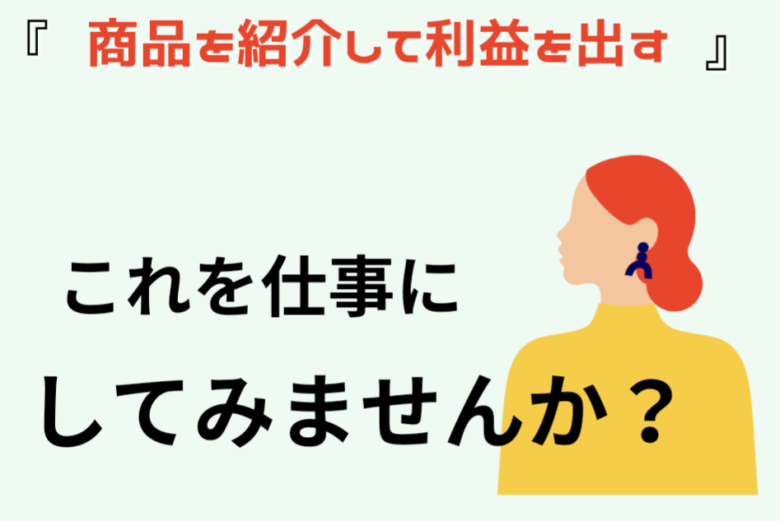
ブログを利用して利益を出す方法
ブログを始めたら、次に気になるのは
「どうやって収益につなげるの?」ということですよね。
そこで欠かせないのが、
ASP(アフィリエイト・サービス・プロバイダ)への登録です!
ブログを利用して収益化を目指す際、まず最初にASP(アフィリエイトサービスプロバイダー)への登録を行い、ブログで収益化するために必須のアフィリエイトリンクを取得します。
具体的なやり方
具体的には、アフィリエイトプログラムに参加し、自分のブログに関連する商品の広告リンクを掲載します。
読者がそのリ広告ンクを通じて商品を購入すると、あなたは手数料を得ることができます。
⇩
まずは、自分のブログのテーマやターゲット読者に合ったASPを選び、登録手続きを行いましょう。
ASP登録後は、取得した広告リンクを活用し、魅力的で有益なコンテンツを作成することが鍵です。
また、SEO対策などを行い、ブログへのアクセス数を増やし、収益のチャンスを広げるていきましょう!
あとは定期的にブログを更新し、読者との信頼関係を築くことで、長期的に利益を出し続けることができます。
ASPの詳しい紹介
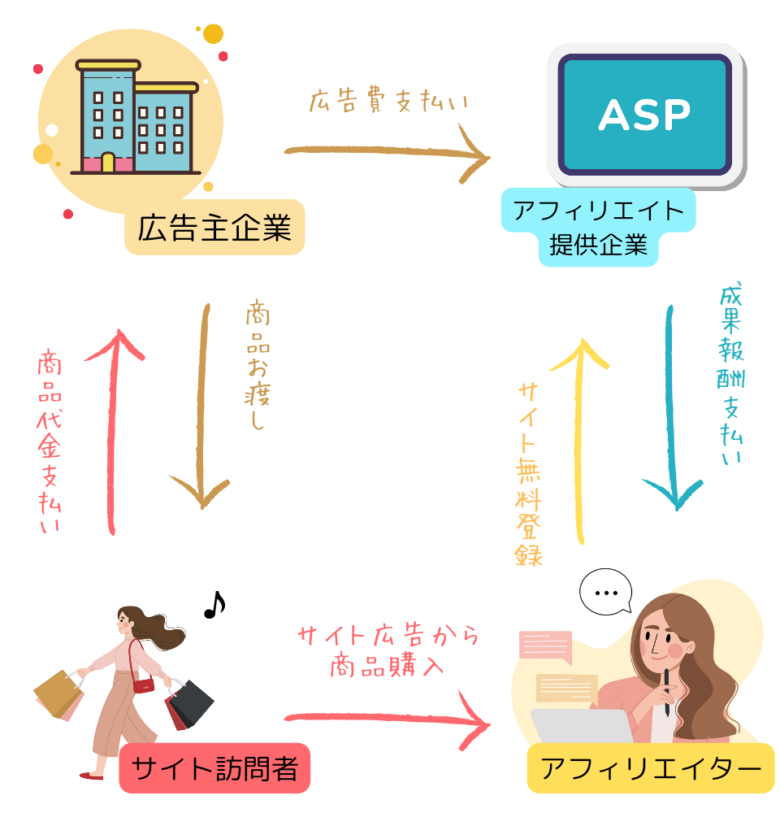
紹介したい商品のリンクをASPから取得します。
リンクをブログに貼りユーザーが商品を購入するとASP会社から報酬が得られる仕組みです。
はるママASPは全て無料で登録できるので、早目に登録しておきましょう!
ASPについて詳しく知りたい方はこの記事をチェックしてみてね👇
あわせて読みたい

アフィリエイト初心者がASPに登録しないと後悔する理由はなに?
正直教えたくありませんが、アフィリエイトするなら今すぐASPに登録して下さい😳✨ アフィリエイト初心者であればASPに登録しないと、100%損をしてしまいます! アフィ…
業界最大手のASPだから安心できる
\ アフィリエイトしている99.9%が登録済! /
【A8.netを利用するメリット】
✅️ 有名ブランドから高額報酬がもらえる広告が掲載できる!
✅️ PCはもちろん、スマホからも広告発行が可能!
✅️もちろん会員登録は無料!その後も費用は一切かかりません!
\ アフィリエイトが無料で学び放題! /
 “>
“>ブログで利益を出すコツ
ブログは単なる日記ではなく、収益を上げる事ができますが、その為にはコツを学ぶ必要があります。
多くのブロガーは、セミナーに参加したり、独学で多くの時間を費やして学ぶことが一般的です。
しかし、効率的に稼ぎたい場合、成功しているブロガーからの情報を得ることが最も効果的な方法です。
成功者の経験やノウハウを参考にすることで、ブログ運営のコツや収益化のポイントを短時間で学ぶことができます。これにより、自分のブログをより早く成長させ、収益化する可能性が高まるのです。

どこで学べばいいかわからない。
早く利益を出したい時はどうすればいい?
はるママ私が実際に課金して勉強したブログガイドブックを紹介します!
たった15記事で収益化した、再現性抜群の方法はこちら!
課金しても後悔しないブログガイドブック👈
超特化ブログの収益化サイト設計ガイド
 はるママ
はるママ私はこの通りにサイト設計して月5桁達成しました!
\ 稼ぐ思考が分かるからなんでも売れる /

「お金を払うのはちょっと」という方は、まず本を読んだり無料でできる方法もあるので、こちらから試してみてください👇
あわせて読みたい

ママブロガー1年目で月5桁稼げるまでにやった無料でできる勉強方法
【実体験】ブログの勉強したいけどできないママへとっておきの勉強方法!『お金がなくても』『時間がなくても』普通のママでもできる収益化への勉強方法を紹介します✨
リンク
初心者でも稼ぎやすい紹介キャンペーン
ブログで収益を上げたいなら、アフィリエイトが最も効果的ですが、実際に始めると難しいこともあります。
そこで「紹介キャンペーン」を利用してみて下さい!
既存顧客が新規顧客を紹介して報酬を得る仕組みで、楽天やメルカリなど有名企業も紹介キャンペーンを沢山行っています。
特に人気の商品を紹介すれば成果が早く出る可能性があり、友人や知人からの推薦は信頼性が高く、読者にとって魅力的な情報となるため、紹介につながりやすくなります。
紹介キャンペーンを活用し、アフィリエイトの壁を越えて収益を得ましょう!
ぜひこちらから真似してみてね
あわせて読みたい

【ブログで自動収益化】子育て中でも月1万稼げる紹介キャンペーン!
友達紹介キャンペーンで稼ぐ方法があるの? ブログで「友達紹介キャンペーン」を活用する事で、毎月1万円以上を稼ぐ事ができるようになりました! 「月1万円の収入が増…
本当にブログで稼げるの?
ブログで稼ぐのは簡単ではありませんが、可能性は誰にでもあります。
成功するには戦略と努力が必要なので、多くの人が結果が出ないことで挫折しますが、続けることで必ず収入を得ることができます!
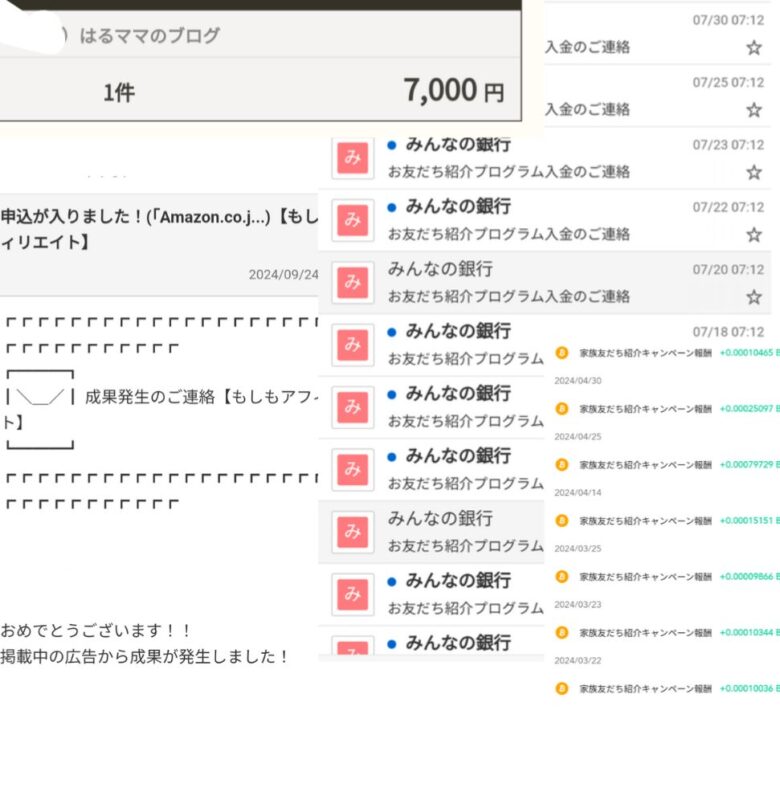
私がブログを1年頑張った結果
「アフィリエイト」と「紹介キャンペーン」を利用してブログのみで実際に稼げました👇
ニッチなジャンルを見つけ、常に質の高いコンテンツを提供することが重要で、ブログだけではなくSEOやSNSを活用して読者を増やし、効果的な収益化方法を試すことで、収入のチャンスが広がります!
成功は簡単とは言えませんが、努力する事でお金の不安がない自由な生活を送ることができる可能性があります!
私のブログにも、ブログで稼ぐ為のヒントが沢山載っているので、良ければチェックしてみて下さい😊✨

-
【今すぐできる】稼げるブログの始め方と4つの収益化パターン
-
【WordPressブログ】 をConoHaWINGで開設する手順
-
【アラフォーのブログ】ブログ開設後に必要なWordPress初期設定14個
-
収益記事と集客記事の違いを知るより手っ取り早く稼ぐ記事を作る方法
-
初心者ブロガーが有料テーマを選ぶ理由とメリットデメリットを紹介
-
【インスタ×ブログ収益化ロードマップ】最短で月5万円稼ぐ方法は?
-
ママブロガーが始めにアフィリエイトするべきおすすめ商品を3つ紹介
-
ママブロガー1年目で月5桁稼げるまでにやった無料でできる勉強方法
-
【初心者向け】浪費家ママが未経験からスマホで月5万円稼げる理由


reCaptcha の認証期間が終了しました。ページを再読み込みしてください。
コメントはこちらから